| |
PhotoSpills Captions
The Captions frame has the controls for creating and placing a caption
onto your poster.

Click on the Font button to select a font style, size
and color.
You can select any font and color that is available on your computer.
Once finished with the font, the name and size of the font will appear under
the blank box in the middle of the frame.
That blank box is used to display your caption.
Click in the box.
A new window will open for you to enter your caption.
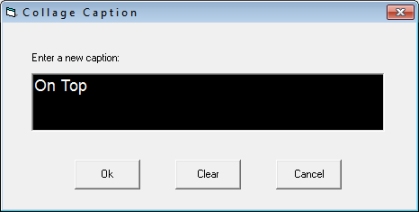
Use the Clear button to remove any text in the window.
Click on Ok when finished entering a caption.
Your caption will appear in the font and color you just selected.
You are limited to one line for your caption.
Note that the background color of this box will be the same as the
background color of your poster.
The Font size arrows in the lower right corner are used
to change the size of the font.
Clicking the Up arrow will cause your caption to increase
in size.
The Caption top and Caption bottom
buttons on the left are used to indicate where you want the caption
to appear.
Normally, captions are written ontop of your photos.
Depending on the design you are using, you may have a Cleared
caption checkbox.
If it is available, you can click on it to clear the photos out of
the area where the caption will be placed.
PhotoSpills does this by adjusting the size and positions of the photos.
Here are two samples of the same collage poster.
The one on the left has the caption written on top
of your photos.
The one on the right has the caption area cleared.


You can also put a seperate caption on each photo in the collage.
This is done by creating a custom frame and adding captions.
You will fine a link below that describes how to do a custom frame.
|
|